User Guide
This user guide is intended to give a quick overview of the main features of audiotoolbox as well as how to use them. For more details, please see the Reference Manual.
Working with Stimuli in the Time Domain
audiotoolbox uses the audiotoolbox.Signal class to represent stimuli in the time domain. This class provides an easy-to-use method of modifying and analyzing signals.
Creating Signals
An empty, 1-second long signal with two channels at 48 kHz is initialized by calling:
>>> signal = audio.Signal(n_channels=2, duration=1, fs=48000)
audiotoolbox supports an unlimited number of channels which can also be arranged across multiple dimensions. For example:
>>> signal = audio.Signal(n_channels=(2, 3), duration=1, fs=48000)
By default, modifications are always applied to all channels at the same time. The following two lines thus add 1 to all samples in both channels:
>>> signal = audio.Signal(n_channels=2, duration=1, fs=48000)
>>> signal += 1
Individual channels can easily be addressed by using the audiotoolbox.Signal.ch indexer:
>>> signal = audio.Signal(n_channels=(2, 3), duration=1, fs=48000)
>>> signal.ch[0] += 1
This will add 1 only to the first channel. The ch indexer also allows for slicing. For example:
>>> signal = audio.Signal(n_channels=3, duration=1, fs=48000)
>>> signal.ch[1:] += 1
This will add 1 to all but the first channel. Internally, the audiotoolbox.Signal class is represented as a numpy array where the first dimension is the time axis represented by the number of samples. Channels are then defined by the following dimensions:
>>> signal = audio.Signal(n_channels=(2, 3), duration=1, fs=48000)
>>> signal.shape
(48000, 2, 3)
Both the number of samples and the number of channels can be accessed through properties of the audiotoolbox.Signal class:
>>> signal = audio.Signal(n_channels=(2, 3), duration=1, fs=48000)
>>> print(f'No. of samples: {signal.n_samples}, No. of channels: {signal.n_channels}')
No. of samples: 48000, No. of channels: (2, 3)
The time axis can be directly accessed using the audiotoolbox.Signal.time property:
>>> signal = audio.Signal(n_channels=1, duration=1, fs=48000)
>>> print(signal.time)
[0.00000000e+00 2.08333333e-05 4.16666667e-05 ... 9.99937500e-01 9.99958333e-01 9.99979167e-01]
It’s important to understand that all modifications are in-place, meaning that calling a method does not return a changed copy of the signal but directly changes the values of the signal:
>>> signal = audio.Signal(n_channels=1, duration=1, fs=48000)
>>> signal.add_tone(frequency=500)
>>> print(signal.var())
0.49999999999999994
Creating a copy of a Signal requires the explicit use of the audiotoolbox.Signal.copy() method. The audiotoolbox.Signal.copy_empty() method can be used to create an empty copy with the same shape as the original:
>>> signal = audio.Signal(n_channels=1, duration=1, fs=48000)
>>> signal2 = signal.copy_empty()
Basic Signal Modifications
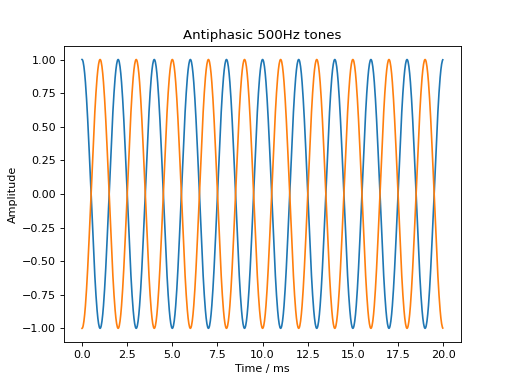
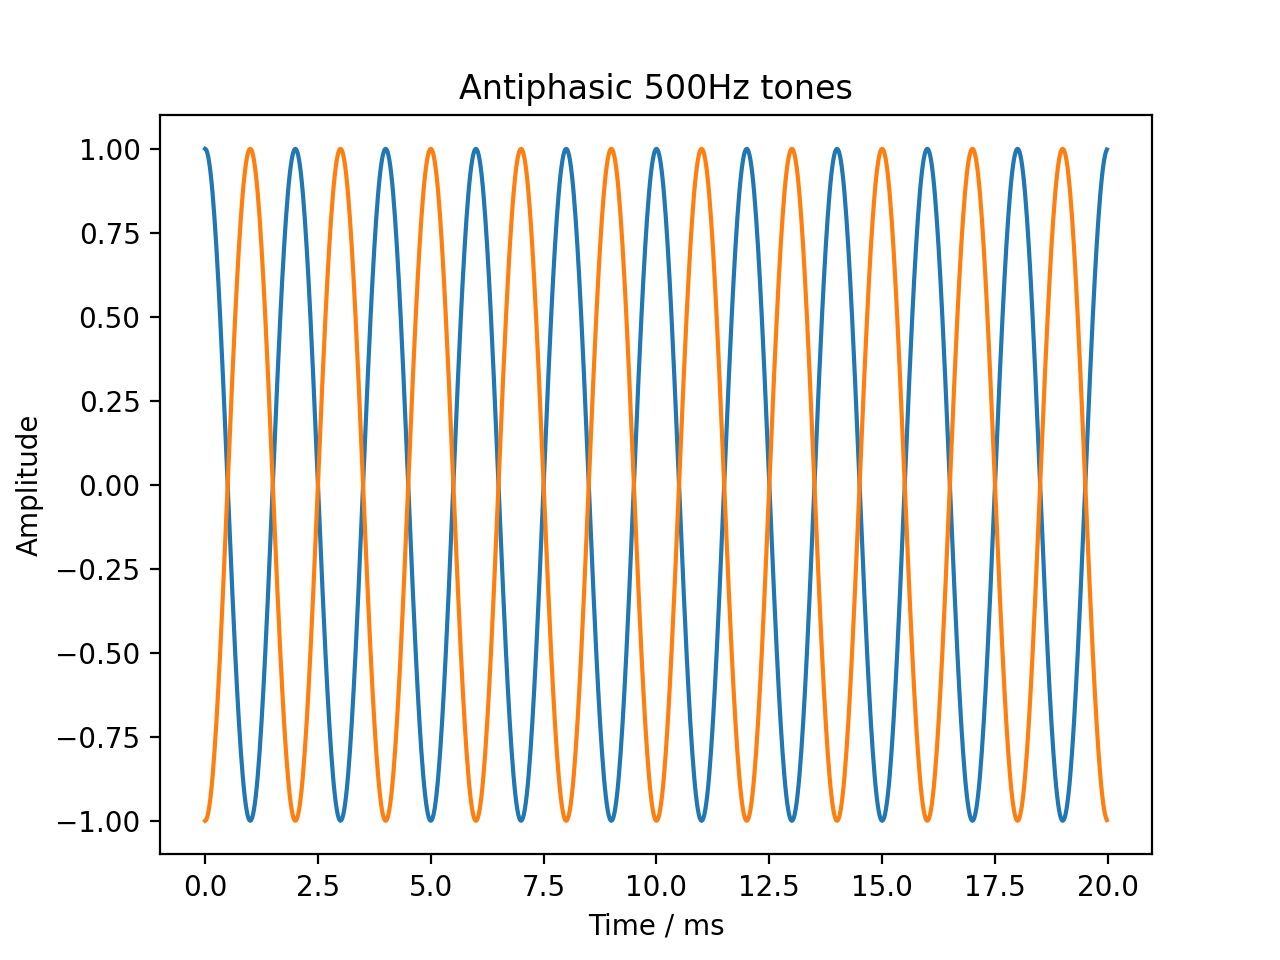
Basic signal modifications such as adding a tone or noise are directly available as methods. Tones are easily added through the audiotoolbox.Signal.add_tone() method. A signal with two antiphasic 500 Hz tones in the two channels is created by running:
sig = audio.Signal(2, 20e-3, 48000)
sig.ch[0].add_tone(frequency=500, amplitude=1, start_phase=0)
sig.ch[1].add_tone(frequency=500, amplitude=1, start_phase=np.pi)

plt.plot(sig.time * 1e3, sig)
plt.xlabel('Time / ms')
plt.ylabel('Amplitude')
plt.title('Antiphasic 500Hz tones')
plt.show()
(Source code, png, hires.png, pdf)

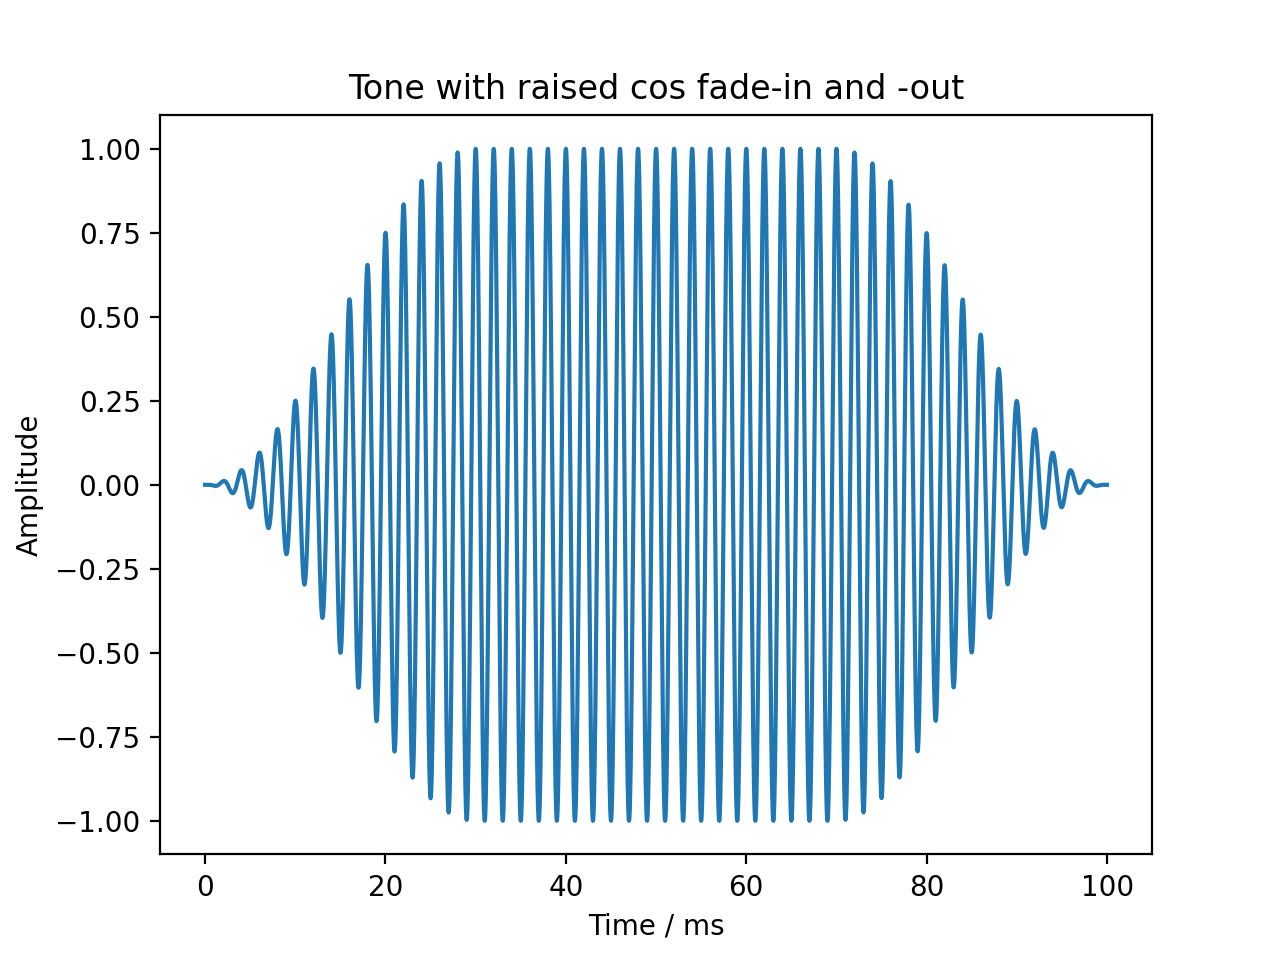
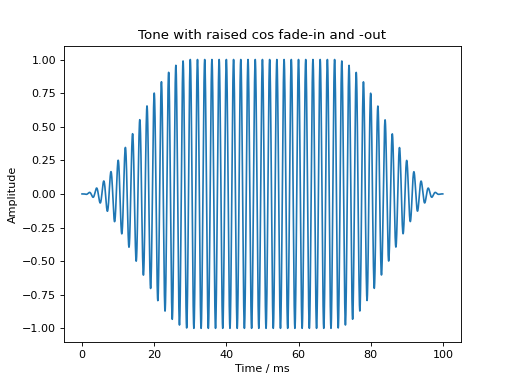
Fade-in and fade-out ramps with different shapes can be applied using the audiotoolbox.Signal.add_fade_window() method:
sig = audio.Signal(1, 100e-3, 48000)
sig.add_tone(frequency=500, amplitude=1, start_phase=0)
sig.add_fade_window(rise_time=30e-3, type='cos')

plt.plot(sig.time * 1e3, sig)
plt.xlabel('Time / ms')
plt.ylabel('Amplitude')
plt.title('Tone with raised cos fade-in and -out')
plt.show()
(Source code, png, hires.png, pdf)
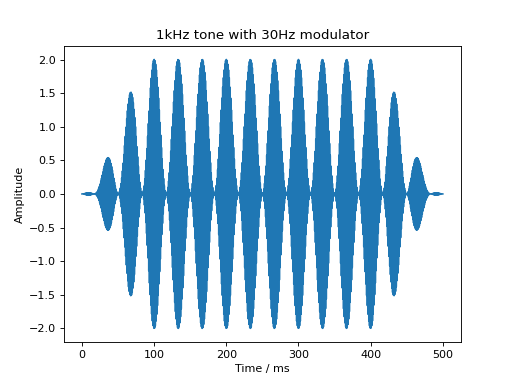
Similarly, a cosine modulator can be added through the audiotoolbox.Signal.add_cos_modulator() method:
sig = audio.Signal(1, 500e-3, 48000)
sig.add_tone(1000)
sig.add_cos_modulator(frequency=30, m=1)
sig.add_fade_window(100e-3)

plt.plot(sig.time * 1e3, sig)
plt.xlabel('Time / ms')
plt.ylabel('Amplitude')
plt.title('1kHz tone with 30Hz modulator')
plt.show()
(Source code, png, hires.png, pdf)

Generating Noise
audiotoolbox provides multiple functions to generate noise:
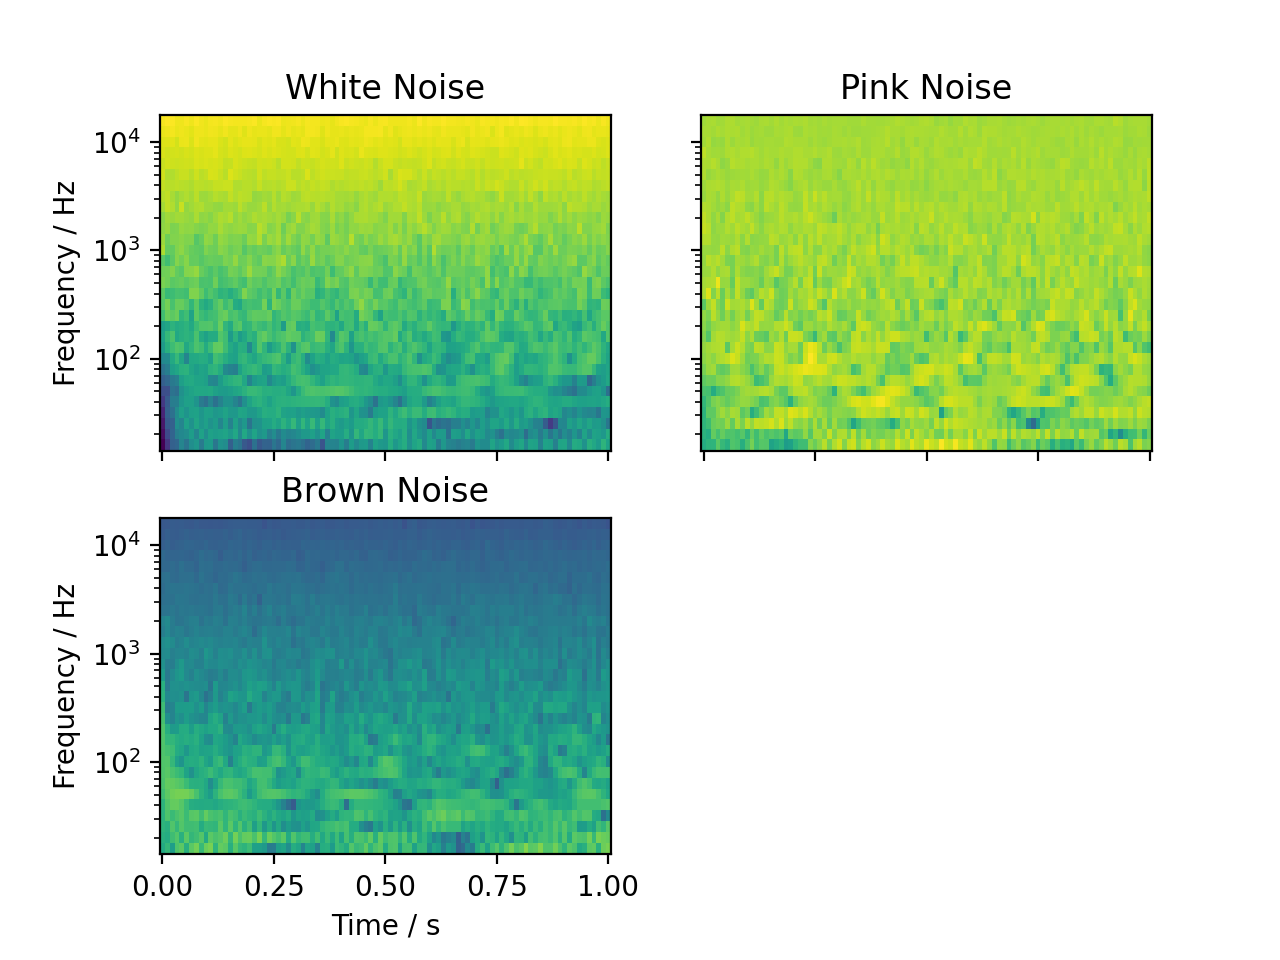
This example adds the same white, pink, or brown Gaussian the signal and plots them as spectrograms (See audiotoolbox.oaudio.time_frequency.TimeFrequency()). The noise variance and a seed for the random number generator can be defined by passing the respective argument (see audiotoolbox.Signal.add_noise()).
white_noise = audio.Signal(1, 1, 48000).add_noise()
pink_noise = audio.Signal(1, 1, 48000).add_noise(ntype='pink')
brown_noise = audio.Signal(1, 1, 48000).add_noise(ntype='brown')

wspec, fc = white_noise.time_frequency.octave_band_specgram(oct_fraction=3)
pspec, fc = pink_noise.time_frequency.octave_band_specgram(oct_fraction=3)
bspec, fc = brown_noise.time_frequency.octave_band_specgram(oct_fraction=3)

norm = plt.Normalize(min([wspec.min(), pspec.min(), bspec.min()]), max([wspec.max(), pspec.max(), bspec.max()]))
fig, ax = plt.subplots(2, 2, sharex='all', sharey='all')
ax[0, 0].set_title('White Noise')
ax[0, 0].pcolormesh(wspec.time, fc, wspec.T, norm=norm)
ax[0, 1].set_title('Pink Noise')
ax[0, 1].pcolormesh(pspec.time, fc, pspec.T, norm=norm)
ax[1, 0].set_title('Brown Noise')
ax[1, 0].pcolormesh(bspec.time, fc, bspec.T, norm=norm)


ax[1, 0].set_xlabel("Time / s")
for a in ax[:, 0]:
    a.set_ylabel('Frequency / Hz')

for a in ax.flatten():
    a.set_yscale('log')
ax[1, 1].set_visible(False)
(Source code, png, hires.png, pdf)

Uncorrelated noise can be generated using the audiotoolbox.Signal.add_uncorr_noise() method. This uses the Gram-Schmidt process to orthogonalize noise tokens to minimize variance in the created correlation:
>>> noise = audio.Signal(3, 1, 48000).add_uncorr_noise(corr=0.2, ntype='white')
>>> np.cov(noise.T)
array([[1.00002083, 0.20000417, 0.20000417],
       [0.20000417, 1.00002083, 0.20000417],
       [0.20000417, 0.20000417, 1.00002083]])
There is also an option to create band-limited, partly-correlated, or uncorrelated noise by defining low-, high-, or band-pass filters that are applied before using the Gram-Schmidt process. For more details, please refer to the documentation of audiotoolbox.Signal.add_uncorr_noise().
Signal Statistics and Levels
Some basic signal statistics are accessible through the audiotoolbox.Signal.stats property. This includes the mean and variance of the channels, calculated per channel. The library also provides convenient methods for level calculations in various units.
Let’s create a pink noise signal and explore its properties:
>>> noise = audio.Signal(2, 1, 48000).add_noise('pink')
>>>
>>> # Get basic statistics
>>> print(f"Mean: {noise.stats.mean}")
Mean: Signal([-2.4e-17, -2.4e-17])
>>> print(f"Variance: {noise.stats.var}")
Variance: Signal([1., 1.])
>>>
>>> # Get level in dB Full Scale (dBFS)
>>> print(f"Level in dBFS: {noise.stats.dbfs}")
Level in dBFS: Signal([3.01, 3.01])
>>>
>>> # Get A-weighted and C-weighted levels
>>> print(f"A-weighted SPL: {noise.stats.dba}")
A-weighted SPL: Signal([89.10, 89.10])
>>> print(f"C-weighted SPL: {noise.stats.dbc}")
C-weighted SPL: Signal([90.82, 90.82])
You can also normalize a signal to a target Sound Pressure Level (SPL), assuming the signal values represent pressure in Pascals.
>>> # Normalize the signal to 70 dB SPL
>>> noise.set_dbspl(70)
>>> # The stats.dbspl property will now reflect this level
>>> noise.stats.dbspl
Signal([70., 70.])
Additionally, it is possible to calculate A-weighted and C-weighted sound pressure levels, which are common in acoustic measurements:
There is also the option to get the octave-band levels:
>>> fc, dbfs = noise.stats.octave_band_levels(oct_fraction=1)
>>> print(fc)
[   31.25    62.5    125.     250.     500.    1000.    2000.    4000.
  8000.   16000.  ]
>>> print(dbfs)
[-32.5484477  -31.64357561 -32.14208818 -32.32627542 -32.59523029
 -32.26243379 -32.38507482 -32.36273354 -32.4864307  -32.51044551]
Loading and saving audio files
This section explains how to load and save signals using the audiotoolbox library. The Signal class provides methods for reading signals from audio files and writing signals to audio files. The library supports all audio file formats supported by libsndfile, such as WAV, FLAC, AIFF, and more.
Loading Signals
To load a signal from an audio file, you can use the from_file method of the Signal class. This method reads a signal from an audio file and returns it as a Signal object. You can specify the start point and the channels to load.
Example
A signal from a file can either be loaded into a new Signal object or an existing one.
To load a signal into a new Signal object, you can use the following code:
from audiotoolbox import Signal

# Load the signal from the file "example.wav" into a new Signal object
sig = Signal.from_file("example.wav")
This code creates a new Signal object and loads the signal from the file “example.wav” into it. The sample rate and number of channels are automatically determined from the file.
If you want to load the signal into an existing Signal object, you can use the following code:
from audiotoolbox import Signal

# Create a Signal object with 2 channels, 1 second duration, and 48 kHz sampling rate
sig = Signal(2, 1, 48000)

# Load the signal from the file "example.wav"
sig.from_file("example.wav")
In this case, the signal is loaded into the existing Signal object sig. The sample rate and number of channels of the file must match the Signal object. If you want to load only a portion of the signal or a specific channel, you can specify additional parameters:
start: The starting sample index to load from the file.
channels: The channel index to load from the file.
To read only a portion of the signal starting at sample index 1000, you can use the following code:
from audiotoolbox import Signal

# Create a Signal object with 1 channel, 1 second duration, and 48 kHz sampling rate
sig = Signal(1, 1, 48000)

# Load the signal from the file "example.wav" starting at sample index 1000
sig.from_file("example.wav", start=1000, channels=0)
Saving Signals
To save a signal to an audio file, you can use the write_file method of the Signal class. This method saves the current signal as an audio file. You can specify additional parameters for the file format through keyword arguments.
Example
Save the signal to a file named “output.wav”:
from audiotoolbox import Signal

# Create a Signal object with 2 channels, 1 second duration, and 48 kHz sampling rate
sig = Signal(2, 1, 48000)

# Save the signal to the file "output.wav"
sig.write_file("output.wav")
Save the signal to a file with a specific format and subtype:
from audiotoolbox import Signal

# Create a Signal object with 2 channels, 1 second duration, and 48 kHz sampling rate
sig = Signal(2, 1, 48000)

# Save the signal to the file "output.wav" with format "WAV" and subtype "PCM_16"
sig.write_file("output.wav", format="WAV", subtype="PCM_16")
Save the signal to a FLAC file:
from audiotoolbox import Signal

# Create a Signal object with 2 channels, 1 second duration, and 48 kHz sampling rate
sig = Signal(2, 1, 48000)

# Save the signal to the file "output.flac" with format "FLAC"
sig.write_file("output.flac", format="FLAC")
See Also
audiotoolbox.from_file(): Function to read an audio file into a new Signal object.audiotoolbox.Signal.from_file(): Method to load a signal into an existing Signal object.audiotoolbox.Signal.write_file(): Method to save a signal to an audio file.
Determining and Setting Levels
This section provides an overview and introduction on how to determine and set levels using the Signal class and the SignalStats class in the audiotoolbox library. The Signal class provides methods for calculating the root mean square (RMS) value, setting the sound pressure level (SPL), and normalizing the signal to a given dBFS RMS value. The SignalStats sub_class provides additional methods for calculating various signal statistics.
Calculating RMS
The RMS value of a signal is a measure of its average power. The rms method of the Signal class calculates the RMS value of the signal.
Example
Calculate the RMS value of a signal:
from audiotoolbox import Signal

# Create a Signal object with 2 channels, 1 second duration, and 48 kHz sampling rate
sig = Signal(2, 1, 48000)

# Calculate the RMS value of the signal
rms_value = sig.rms()
print(f"RMS value: {rms_value}")
Setting Sound Pressure Level (SPL)
The SPL of a signal is a measure of its loudness. The set_dbspl method of the Signal class normalizes the signal to a given SPL in dB relative to 20e-6 Pa.
Example
Set the SPL of a signal to 70 dB:
from audiotoolbox import Signal

# Create a Signal object with 2 channels, 1 second duration, and 48 kHz sampling rate
sig = Signal(2, 1, 48000)

# Set the SPL of the signal to 70 dB
sig.set_dbspl(70)
Setting dBFS RMS Value
The dBFS RMS value of a signal is a measure of its amplitude relative to the full scale. The set_dbfs method of the Signal class normalizes the signal to a given dBFS RMS value.
Example
Set the dBFS RMS value of a signal to -3 dB:
from audiotoolbox import Signal

# Create a Signal object with 2 channels, 1 second duration, and 48 kHz sampling rate
sig = Signal(2, 1, 48000)

# Set the dBFS RMS value of the signal to -3 dB
sig.set_dbfs(-3)
Example
Set the level of one signal 10db above another signal:
from audiotoolbox import Signal

# Create a Signal object with 2 channels, 1 second duration, and 48 kHz sampling rate
sig1 = Signal(2, 1, 48000)
sig2 = Signal(2, 1, 48000)

# Set the level of sig1 10db above sig2
sig1.set_dbfs(sig2.stats.dbfs + 10)
Set the level of channel one of a signal 5 db below channel two:
from audiotoolbox import Signal

# Create a Signal object with 2 channels, 1 second duration, and 48 kHz sampling rate
sig = Signal(2, 1, 48000)

# Set the level of channel one 5 db below channel two
sig.ch(1).set_dbfs(sig.ch(2).stats.dbfs - 5)
Calculating Signal Statistics
The SignalStats class provides methods for calculating various signal statistics, such as SPL, dBFS, crest factor, and A-weighted and C-weighted SPL.
Example
Calculate the SPL, dBFS, and crest factor of a signal:
from audiotoolbox import Signal

# Create a Signal object with 2 channels, 1 second duration, and 48 kHz sampling rate
sig = Signal(2, 1, 48000)

# Calculate the SPL of the signal
spl_value = sig.stats.dbspl
print(f"SPL value: {spl_value} dB")

# Calculate the dBFS of the signal
dbfs_value = sig.stats.dbfs
print(f"dBFS value: {dbfs_value} dB")

# Calculate the crest factor of the signal
crest_factor_value = sig.stats.crest_factor
print(f"Crest factor: {crest_factor_value} dB")

# Calculate the rms value of the signal
rms_value = sig.stats.rms
print(f"RMS value: {rms_value}")
Calculate the A-weighted and C-weighted SPL of a signal:
from audiotoolbox import Signal

# Create a Signal object with 2 channels, 1 second duration, and 48 kHz sampling rate
sig = Signal(2, 1, 48000)

# Calculate the A-weighted SPL of the signal
dba_value = sig.stats.dba
print(f"A-weighted SPL: {dba_value} dB")

# Calculate the C-weighted SPL of the signal
dbc_value = sig.stats.dbc
print(f"C-weighted SPL: {dbc_value} dB")
See Also
audiotoolbox.Signal.rms(): Method to calculate the RMS value of the signal.audiotoolbox.Signal.set_dbspl(): Method to set the SPL of the signal.audiotoolbox.Signal.set_dbfs(): Method to set the dBFS RMS value of the signal.audiotoolbox.SignalStats.dbspl(): Property to calculate the SPL of the signal.audiotoolbox.SignalStats.dbfs(): Property to calculate the dBFS of the signal.audiotoolbox.SignalStats.crest_factor(): Property to calculate the crest factor of the signal.audiotoolbox.SignalStats.dba(): Property to calculate the A-weighted SPL of the signal.audiotoolbox.SignalStats.dbc(): Property to calculate the C-weighted SPL of the signal.
Time-Frequency Methods
Spectrograms
The time-frequency submodule provides several methods of calculating spectrograms either based on short-term Fourier transforms or based on filterbanks.
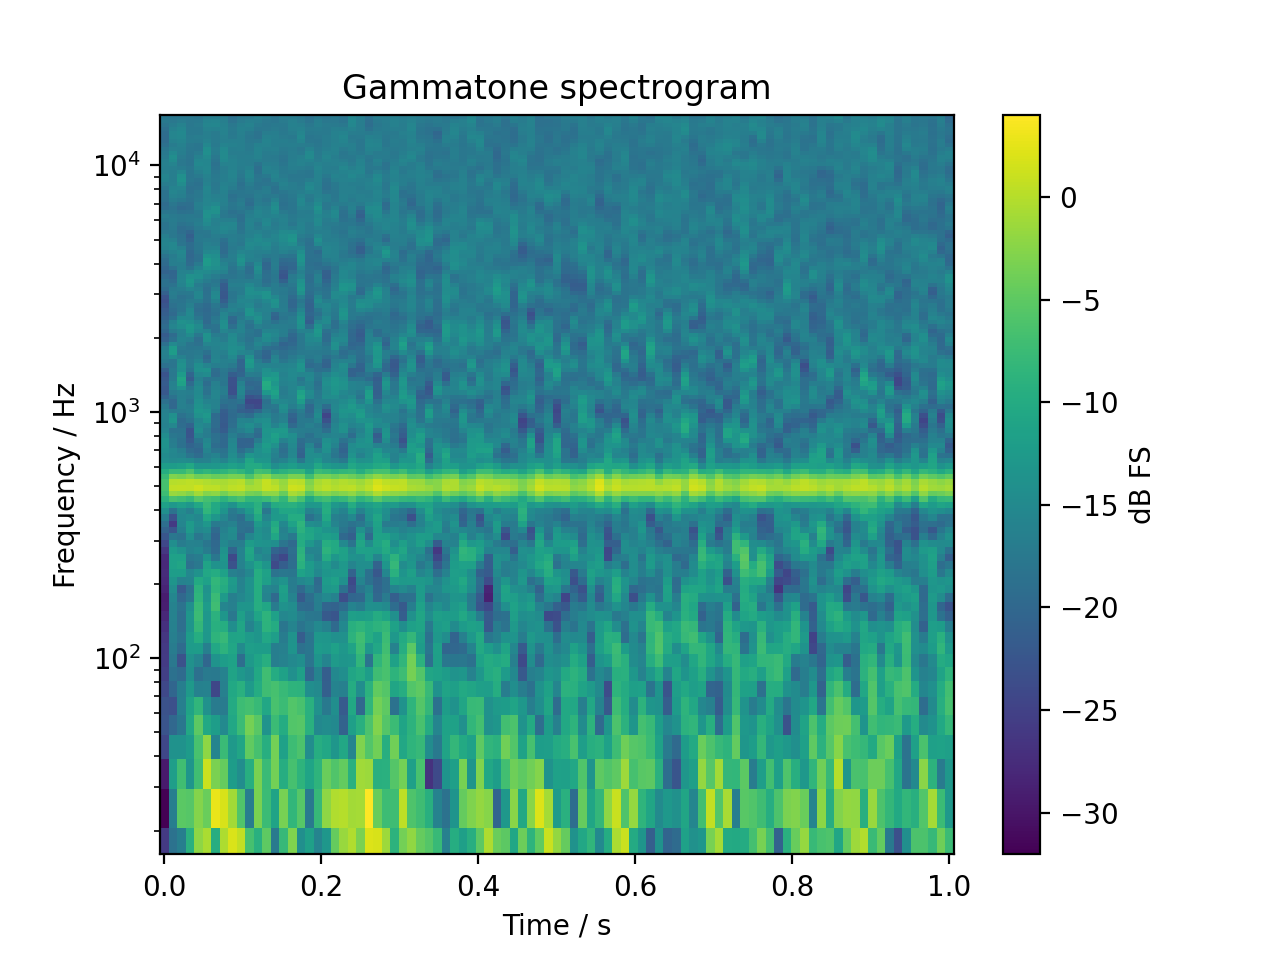
Plotting a gamma-tone filterbank (1/3 ERB spacing) based spectrogram of a 500Hz tone in pink noise:
sig = audio.Signal(1, 1, 48000)
sig.add_tone(500).set_dbfs(0)
sig.add_noise("pink")
sig.add_fade_window(10e-3)


spec, fc = sig.time_frequency.gammatone_specgram(
    nperseg=1024, noverlap=512, flow=16, fhigh=16000, step=1 / 3
)
fig, ax = plt.subplots(1, 1)
cb = ax.pcolormesh(spec.time, fc, spec.T)
ax.set_yscale("log")
ax.set_ylim(16, 16000)
ax.set_ylabel("Frequency / Hz")
ax.set_xlabel("Time / s")
ax.set_title("Gammatone spectrogram")
cb = plt.colorbar(cb, ax=ax)
cb.set_label("dB FS")
plt.show()
(Source code, png, hires.png, pdf)

The same signal in an octave-band based spectrogram:
sig = audio.Signal(1, 1, 48000)
sig.add_tone(500).set_dbfs(0)
sig.add_noise("pink")
sig.add_fade_window(10e-3)


spec, fc = sig.time_frequency.octave_band_specgram(
    nperseg=1024, noverlap=512, flow=16, fhigh=16000
)
fig, ax = plt.subplots(1, 1)
cb = ax.pcolormesh(spec.time, fc, spec.T)
ax.set_yscale("log")
ax.set_ylim(16, 16000)
ax.set_ylabel("Frequency / Hz")
ax.set_xlabel("Time / s")
ax.set_title("1/3 Octave-band spectrogram")
cb = plt.colorbar(cb, ax=ax)
cb.set_label("dB FS")
plt.show()
(Source code, png, hires.png, pdf)

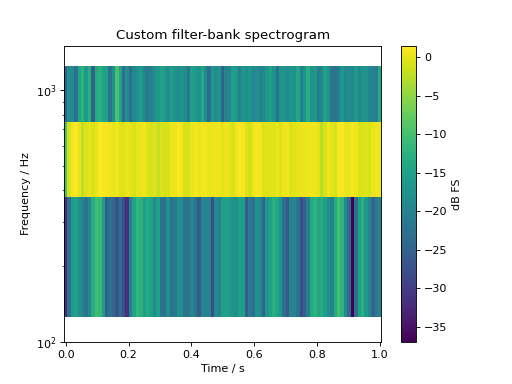
It’s also possible to create spectrograms based on custom filter-banks
sig = audio.Signal(1, 1, 48000)
sig.add_tone(500).set_dbfs(0)
sig.add_noise("pink")
sig.add_fade_window(10e-3)

bank = audio.filter.bank.create_filterbank(fc=[250, 500, 1000], bw=[25, 50, 100], filter_type="butter", fs=sig.fs)


spec, fc = sig.time_frequency.filterbank_specgram(bank=bank,
    nperseg=1024, noverlap=512
)
fig, ax = plt.subplots(1, 1)
cb = ax.pcolormesh(spec.time, fc, spec.T)
ax.set_yscale("log")
ax.set_ylim(100, 1500)
ax.set_ylabel("Frequency / Hz")
ax.set_xlabel("Time / s")
ax.set_title("Custom filter-bank spectrogram")
cb = plt.colorbar(cb, ax=ax)
cb.set_label("dB FS")
plt.show()
(Source code, png, hires.png, pdf)
Filtering
The audiotoolbox library provides access to commonly used filters as well as the option to generate filterbanks. Filters can be accessed through the audiotoolbox.filter submodule.
Individual Filters
You can directly call individual filters. The following filters are currently implemented:
audiotoolbox.filter.butterworth(): The Butterworth filter implemented by scipy (second order sections).audiotoolbox.filter.brickwall(): A brickwall filter implemented in the frequency domain.audiotoolbox.filter.gammatone(): A (complex valued) gammatone filter.
When used with the Signal class, there is no need to provide a sampling frequency:
import audiotoolbox as audio

sig = audio.Signal(2, 1, 48000)
filt_sig = audio.filter.gammatone(sig, fc=500, bw=80)
Unified Interface for Filters
There is also a unified interface for low-pass, high-pass, and band-pass filters:
audiotoolbox.filter.lowpass(): Low-pass filter, currently Butterworth or Brickwall.audiotoolbox.filter.highpass(): High-pass filter, currently Butterworth or Brickwall.audiotoolbox.filter.bandpass(): Band-pass filter, currently Butterworth, Brickwall, Gammatone.
A third-order Butterworth filter can be implemented as follows:
import audiotoolbox as audio

sig = audio.Signal(2, 1, 48000)
filt_sig = audio.filter.lowpass(sig, f_cut=1000, filter_type='butter', order=3)
Or:
sig = audio.Signal(2, 1, 48000)
filt_sig = audio.filter.butterworth(sig, low_f=None, high_f=1000, order=3)
The three unified interfaces are also implemented as methods of the audiotoolbox.Signal class:
sig = audio.Signal(2, 1, 48000).add_noise()
lp_sig = sig.copy().lowpass(f_cut=1000, filter_type='butter', order=3)
hp_sig = sig.copy().highpass(f_cut=1000, filter_type='butter', order=3)
bp_sig = sig.copy().bandpass(fc=2000, bw=500, filter_type='butter', order=3)
See audiotoolbox.Signal.lowpass(), audiotoolbox.Signal.highpass(), and audiotoolbox.Signal.bandpass() for more information.
Filterbanks
audiotoolbox provides two commonly used standard banks as well as the option to build custom banks.
Currently, the following standard banks are available:
audiotoolbox.filter.bank.octave_bank(): (fractional) Octave filterbank.audiotoolbox.filter.bank.auditory_gamma_bank(): An auditory gammatone-filterbank.
A 1/3 octave fractional filterbank can be generated as follows:
bank = audio.filter.bank.octave_bank(fs=48000, flow=24.8, fhigh=20158.0, oct_fraction=3)
print(bank.fc)
# Output: array([   24.80314144,    31.25      ,    39.37253281,    49.60628287,
#                   62.5       ,    78.74506562,    99.21256575,   125.        ,
#                  157.49013124,   198.4251315 ,   250.        ,   314.98026247,
#                  396.85026299,   500.        ,   629.96052495,   793.70052598,
#                 1000.        ,  1259.92104989,  1587.40105197,  2000.        ,
#                 2519.84209979,  3174.80210394,  4000.        ,  5039.68419958,
#                 6349.60420787,  8000.        , 10079.36839916, 12699.20841575,
#                16000.        , 20158.73679832])
With all filter-banks, a Signal can either be filtered by applying the whole bank at the same time, returning a multi-channel signal:
sig = audio.Signal(2, 1, 48000).add_noise()
filt_sig = bank.filt(sig)
print(filt_sig.n_channels)
# Output: (2, 30)
Or, alternatively, the filterbank can also be indexed to apply individual filters:
filt_sig = bank[2:4].filt(sig)
print(filt_sig.n_channels)
# Output: (2, 2)
The audiotoolbox.filter.bank.create_filterbank() can be used to create custom filterbanks. For example, a brickwall filterbank with filters around 100Hz, 200Hz, and 300Hz with bandwidths of 10Hz, 20Hz, and 30Hz can be created as follows:
fc_vec = np.array([100, 200, 300])
bw_vec = np.array([10, 20, 30])
bank = audio.filter.bank.create_filterbank(fc=fc_vec, bw=bw_vec, filter_type='brickwall', fs=48000)
sig = audio.Signal(2, 1, 48000).add_noise()
filt_sig = bank.filt(sig)
print(filt_sig.n_channels)
# Output: (2, 3)
Frequency Weighting
audiotoolbox implements A and C weighting filters following IEC 61672-1. Both C and A weighted sound pressure levels can be accessed as properties through audiotoolbox.Signal.stats. Additionally, the filters can be applied through audiotoolbox.filter.a_weighting() and audiotoolbox.filter.c_weighting().
noise = audio.Signal(3, 1, 48000).add_noise('pink')
print(noise.stats.dba)
# Output: Signal([89.10458354, 89.10458354, 89.10458354])

noise = audio.Signal(3, 1, 48000).add_noise('pink')
print(noise.stats.dbc)
# Output: Signal([90.82348995, 90.82348995, 90.82348995])